Using the JSON from the response payload
Making use of the JSON response
Seeing the response from cURL or Postman is cool, but how do you make use of the JSON data?
With most API documentation, you don't need to show how to make use of JSON data. You assume that developers will use their JavaScript skills to parse through the data and display it appropriately in their apps.
However, to better understand how developers will access the data, we'll go through a brief tutorial to display the REST response on a web page.
Display part of the REST JSON response on a web page
Mashape provides some sample code to parse and display the REST response on a web page using JavaScript. You could use it, but you could also use some auto-generated code from Postman to do pretty much the same thing.
Start with a basic HTML template with jQuery referenced, like this:
 <html>
 <head>
 <title>Sample Page</title>
 <script src="http://ajax.googleapis.com/ajax/libs/jquery/1.11.1/jquery.min.js"></script>
 </head>
 <body>

 </body>
 </html>
Save your file with a name such as weatherdata.html.
Open Postman and click the request to the
weatherdataendpoint that you configured earlier.Click the Generate Code Snippet button.

Select JavaScript > jQuery AJAX.
- Copy the code sample.
Insert the Postman code sample between
<script>tags in the same template you started building in step 1.You can put the script in the
headsection if you want — just make sure you add it after the jQuery reference.The Postman code sample needs one more parameter:
dataType. Add"dataType": "json"as parameter insettings.{{warning}} Make sure you capitalize the
TindataType.{{end}}Your final code should look like this:
 <html>
 <head>
 <script src="http://ajax.googleapis.com/ajax/libs/jquery/1.11.1/jquery.min.js"></script>
 </head>
 <title>Sample Page</title>
 <script>
 var settings = {
   "async": true,
   "crossDomain": true,
   "dataType": "json",
   "url": "https://simple-weather.p.mashape.com/weatherdata?lat=37.354108&lng=-121.955236",
   "method": "GET",
   "headers": {
     "accept": "application/json",
     "x-mashape-key": "APIKEY"
   }
 }
 $.ajax(settings).done(function (response) {
   console.log(response);
 });
 </script>
 <body>
 </body>
 </html>
Start Chrome and open the JavaScript Console by going to View > Developer > JavaScript Console.
Open the weatherdata.html file in Chrome (File > Open File).
The page body will be blank, but the weatherdata response should be logged to the JavaScript console. You can inspect the payload by expanding the sections.
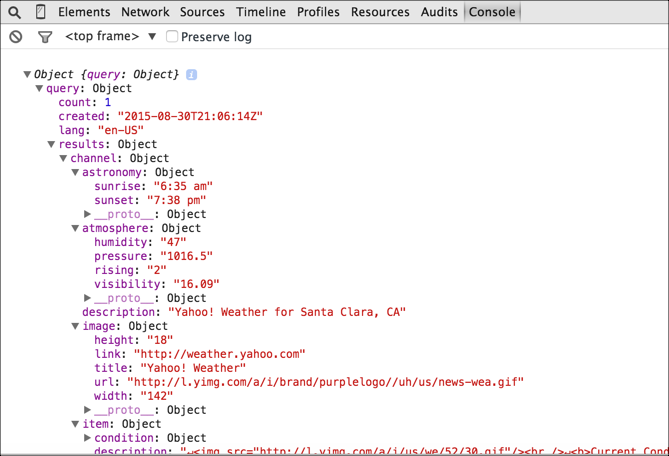
Note that Chrome tells you whether each expandable section is an object or an array. Knowing this is critical to accessing the value through JavaScript dot notation.
The following sections will explain this AJAX code a bit more.
The AJAX method from jQuery
Probably the most useful method to know for showing code samples is the ajax method from jQuery.
In brief, this ajax method takes one argument: settings.
$.ajax(settings)
The settings argument is an object that contains a variety of key-value pairs. Each of the allowed key-value pairs is defined in jQuery's ajax documentation.
Some important values are the url, which is the URI or endpoint you are submitting the request to. Another value is headers, which allows you to include custom headers in the request.
Look at the code sample you created. The settings variable is passed in as the argument to the ajax method. jQuery makes the request to the HTTP URL asynchronously, which means it won't hang up your computer while you wait for the response. You can continue using your application while the request executes.
You get the response by calling the method done. In the preceding code sample, done contains an anonymous function (a function without a name) that executes when done is called.
The response object from the ajax call is assigned to the done method's argument, which in this case is response. (You can name the argument whatever you want.)
You can then access the values from the response object using object notation. In this example, the response is just logged to the console.
This is likely a bit fuzzy right now, but it will become more clear with an example in the next section.
Logging responses to the console
The piece of code that logged the response to the console was simply this:
console.log(response);
Logging responses to the console is one of the most useful ways to test whether an API response is working (it's also helpful for debugging or troubleshooting your code). The console collapses each object inside its own expandable section. This allows you to inspect the payload.
You can add other information to the console log message. To preface the log message with a string, add something like this:
console.log("Here's the response: " + response);
Strings are always enclosed inside quotation marks, and you use the plus sign + to concatenate strings with JavaScript variables, like response.
Customizing log messages is helpful if you're logging various things to the console and need to flag them with an identifier.
Inspect the payload
Inspect the payload by expanding each of the sections in the Mashape weather API. Find the section that appears here: object > query > results > channel > item > description.