Documenting parameters
Parameters are ways to configure the endpoint
Parameters refer to the various ways the endpoint can be configured to influence the response. Many times parameters are out in a simple table like this:
| Parameter | Required? | Data Type | Example |
|---|---|---|---|
| format | optional | string | json |
Here's an example from Yelp's documentation:

You can format the values in a variety of ways. If you're using a definition list or other non-table format, you should develop styles that make the values easily readable.
Four types of parameters
REST APIs have four types of parameters:
- Path parameters: Parameters that appear within the path of the endpoint, before the query string (
?) - Query string parameters: Parameters that appear in the query string of the endpoint, after the
?. - Request body parameters: Parameters that are included in the request body. Usually submitted as JSON.
- Header parameters: Parameters that are included in the request header. Usually header parameters relate to authorization.
Data types indicate the format for the values
It's important to list the data type for each parameter because APIs may not process the parameter correctly if it's the wrong data type or wrong format. These data types are the most common:
- string: An alphanumeric sequence of letters and possibly numbers.
- integer: A whole number — can be positive or negative.
- boolean: true or false.
- object: Key-value pairs in JSON format
There are more data types in programming, and if you have more specific data types, be sure to note them. In Java, for example, it's important to note the data type allowed because Java allocates memory space based on the size of the data. As such, Java gets much more specific about the size of numbers. You have a byte, short, int, double, long, float, char, boolean, and so on.
However, you usually don't have to specify this level of detail with a REST API. You can probably just write "number."
Parameters should list allowed values
One of the problems with the Mashape Weather API is that it doesn't tell you which values are allowed for the latitude and longitude. If you type in coordinates for Bangalore, for example, 12.9539974 and 77.6309395, the response is Not Supported - IN - India - IN-KA. Which cities are supported, and where does one look to see a list? This information should be made explicit in the description of parameters.
Parameter order doesn't matter
Often the parameters are added with a query string (?) at the end of the endpoint, and then each parameter is listed one right after the other with an ampersand (&) separating them. Usually the order in which parameters are passed to the endpoint does not matter.
For example:
/surfreport/{beachId}?days=3&units=metric&time=1400
and
/surfreport/{beachId}?time=1400&units=metric&days=3
would return the same result.
However, if the parameter is part of the actual endpoint path (not added in the query string), such as with {beachId} above, then you usually describe this value in the description of the endpoint itself.
Here's an example from Twilio:
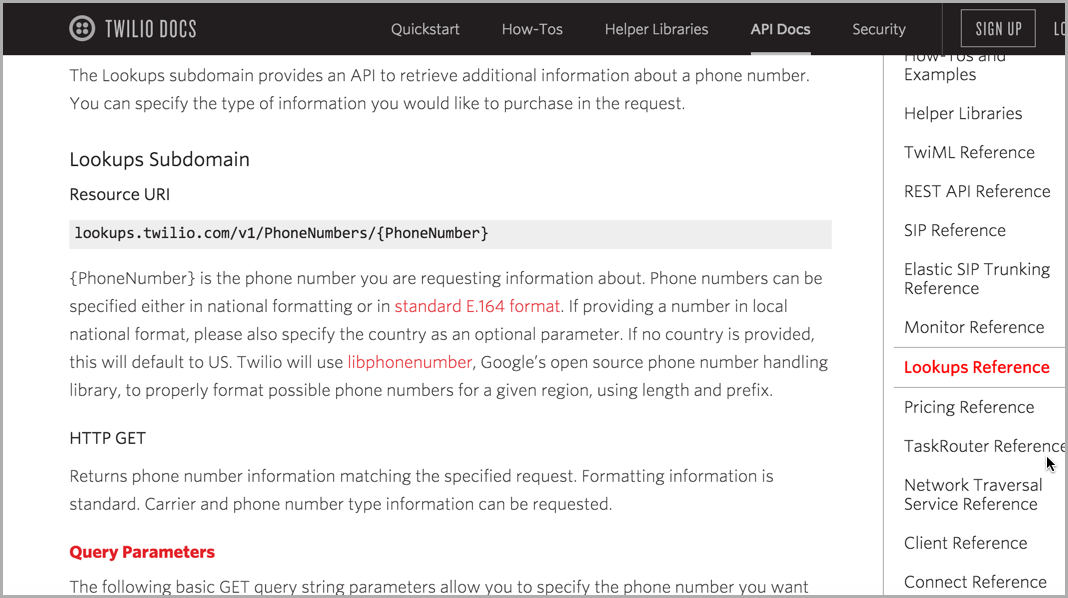
The {PhoneNumber} value is described in the description of the endpoint rather than in another section that lists the query parameters you can pass to the endpoint.
Other important details about parameters are the maximum of minimum values allowed for the parameter, and whether the parameter is optional or required.
When you test an API, try running an endpoint without the required parameters, or with the wrong parameters. See what kind of error response comes back. Include that response in your response codes section.
Color coding parameter values
When you list the parameters in your endpoint, it can help to color code the parameters both in the table and in the endpoint definition. This makes it clear what's a parameter and what's not. Through color you create an immediate connection between the endpoint and the parameter definitions.
For example, suppose your endpoint definition is as follows:
Follow through with this same color in your table describing the parameters:
| URL Parameter | Description |
|---|---|
| user | Here's my description of the user parameter. |
| bicycles | Here's my description of the bicycles parameter. |
By color coding the parameters, it's easy to see the parameter in contrast with the other parts of the URL.
Note that if you're custom-color-coding the parameters, you'll need to skip the automatic syntax highlighting options in code blocks and just use either your own styles or a general pre element.
Passing parameters in the JSON body
Frequently with POST requests, you will submit a JSON object in the request body. This JSON object may be a lengthy list of key value pairs with multiple levels of nesting.
For example, the endpoint URL may be something simple, such as /surfreport/{beachId}. But in the body of the request, you might include a JSON object, like this:
{
"days": 2,
"units": "imperial",
"time": 1433524597
}
This is known as a request body parameter.
Documenting lengthy JSON objects in request bodies
Documenting JSON data (both in request body parameters and responses) is actually one of the trickier parts of API documentation. Documenting a JSON object is easy if the object is simple, with just a few key-value pairs. But what if you have a JSON object with multiple objects inside objects, numerous levels of nesting, and lengthy and conditional data? What if the JSON object spans more than 100 lines, or 1,000?
Tables work all right for documenting JSON, but in a table, it can be hard to distinguish between top-level and sub-level items. The object that contains an object that also contains an object, etc., can be confusing to represent.
By all means, if the JSON object is relatively small, a table is probably your best option. But there are other approaches that designers have taken as well.
Take a look at eBay's findItemsByProduct endpoint.
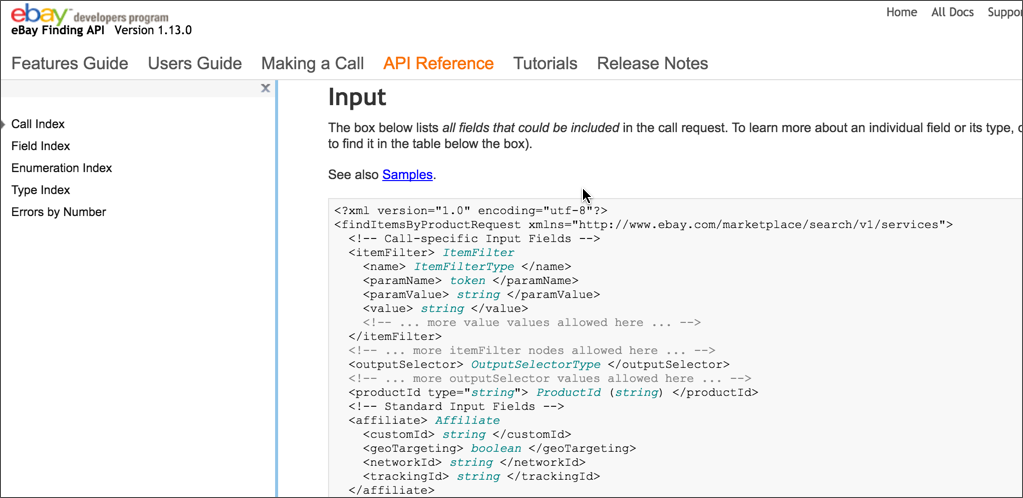
There's a table below the sample request that describes each parameter:
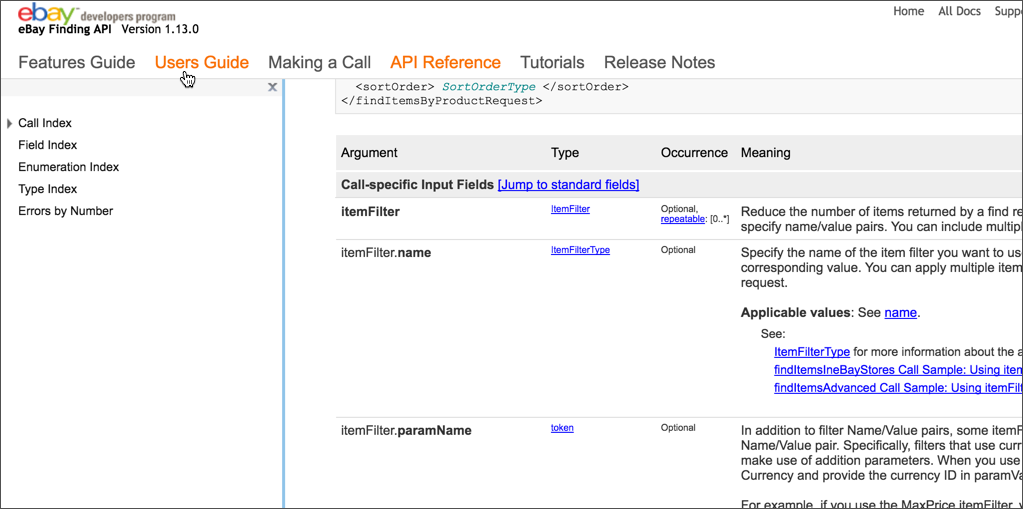
But the sample request also contains links to each of the parameters. When you click a parameter value in the sample request, you go to a page that provides more details about that parameter value, such as the ItemFilter. This is likely because the parameter values are more complex and require more explanation.
The same parameter values might be used in other requests as well, so this facilitates re-use. Even so, I dislike jumping around to other pages for the information I need.
Swagger UI's approach
Is the display from the Swagger UI any better?
The Swagger UI reads the Swagger spec file and displays it in the visual format that you see with examples such as the Swagger Petstore.
The Swagger UI lets you toggle between an "Example Value" and a "Model" view for both responses and request body parameters.
The Example Value shows a sample of the syntax along with examples. When you click the Model (yellow box) in the /Pet (POST) endpoint, Swagger inserts the content in the body parameter box. Here's the Pet POST endpoint's Example Value:
{
  "id": 0,
  "category": {
    "id": 0,
    "name": "string"
  },
  "name": "doggie",
  "photoUrls": [
    "string"
  ],
  "tags": [
    {
      "id": 0,
      "name": "string"
    }
  ],
  "status": "available"
}
Now click Model (the grayed out text) and look at the view.
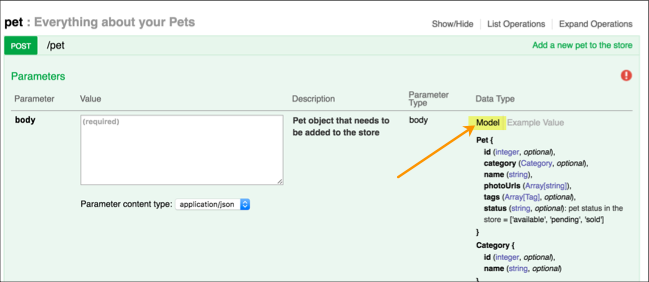
This view describes the various parts of the request, noting the data types and any descriptions in your Swagger spec. Here's the Model:
Pet {
    id (integer, optional),
    category (Category, optional),
    name (string),
    photoUrls (Array[string]),
    tags (Array[Tag], optional),
    status (string, optional): pet status in the store = ['available', 'pending', 'sold']
}
Category {
    id (integer, optional),
    name (string, optional)
}
Tag {
    id (integer, optional),
    name (string, optional)
}
The Petstore spec doesn't actually include many parameter descriptions in the Model, but if any descriptions that are included, they would appear here in the Model rather than the Example Value.
In this view, when there's a nested object, like category, it has a reference to another part of the model. You have to look at "Category" for details about category and look at "Tag" for details about tags.
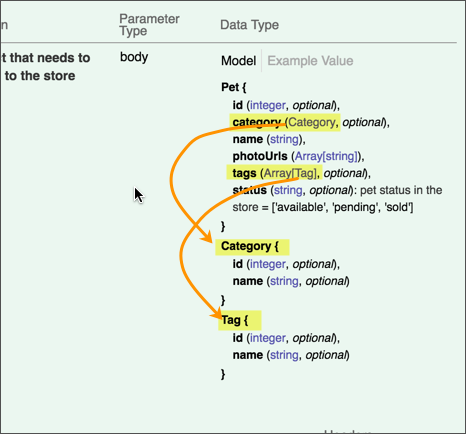
Presumably the Model format appears like this because there's not enough room to visually depict nested objects in one inch of space. But it could potentially mislead users into thinking that you have multiple objects listed one after another instead of nested inside each other.
Ultimately, I'm not sure how useful the Model view is beyond providing a place to describe the objects and properties. I'm also not sure why the Swagger team didn't include descriptions of each parameter in the request body, because those descriptions could appear in the Model view and thereby provide more rationale for having the Model view in the first place.
Conclusion
You can see that there's a lot of variety in documenting JSON and XML responses. There's no right way to document the parameters, except to choose the method that depicts the parameters in the clearest, easiest to read way.
Construct a table to list the surfreport parameters
For our new surfreport endpoint, look through the parameters available and create a table similar to the one above.
Here's what my table looks like:
| Parameter | Required | Description | Type |
|---|---|---|---|
| days | Optional | The number of days to include in the response. Default is 3. | Integer |
| units | Optional | Options are either imperial or metric. Whether to return the values in imperial or metric measurements. Imperial will use feet, knots, and fahrenheit. Metric will use centimeters, kilometers per hour, and celsius. metric is the default. |
string |
| time | Optional | If you include the time, then only the current hour will be returned in the response. | integer. Unix format (ms since 1970) in UTC. |