Github wikis
Github wikis as complementary repositories to code projects
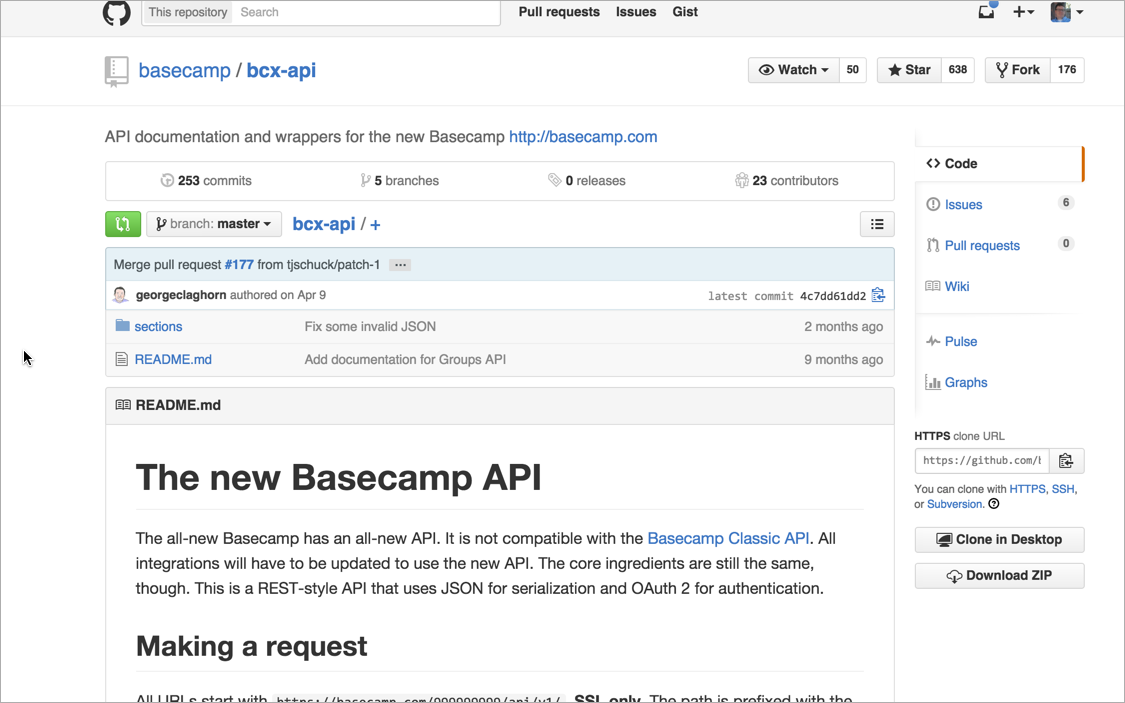
When you create a repository on Github, the repository comes with a wiki that you can add pages to. This wiki can be really convenient if your source code is stored on Github.
Here's an example of the Basecamp API, which is housed on Github.
Markdown syntax
You write wiki pages in Markdown syntax. There's a special flavor of Markdown syntax for Github wikis. The Github Flavored Markdown allows you to create tables, add classes to code blocks (for proper syntax highlighting), and more.
The wiki repository
The wiki you create is its own repository that you can clone locally. (If you look at the "Clone this wiki locally link," you'll see that it's a separate repo from your main code repository.) You can work on files locally and then commit them to the wiki repository when you're ready to publish.
You can also arrange the wiki pages into a sidebar.
Treating doc as code
One of the neat things about using a Github repository is that you treat the doc as code, editing it in a text editor, committing it to a repository, and packaging it up into the same area as the rest of the source code. Because it's in its own repository, technical writers can work in the documentation right alongside project code without getting merge conflicts.
Working locally allows you to leverage other tools
Because you can work with the wiki files locally, you can leverage other tools (such as static site generators, or even DITA) to generate the Markdown files. This means you can handle all the re-use, conditional filtering, and other logic outside of the Github wiki. You can then output your content as Markdown files and then commit them to your Github repository.
Limitations with Github wikis
There are some limitations with Github wikis:
- Limited branding. All Github wikis look the same.
- Open access on the web. If your docs need to be private, Github isn't the place to put them.
- No structure. The Github wiki pages give you a blank page and basically allow you to add sections. You won't be able to do any advanced styling or sexy-looking interactive API doc.
Create a Github wiki and publish content on a sample page
In this section, you will create a new Github repo and publish a sample file there.
In this section, you'll be using Git commands through your terminal or command prompt. In later tutorials, you'll use the Github Desktop and Github browser tools. Basically, you can interact with Github in a variety of ways.
- Go to Github.com and either sign in or create an account.
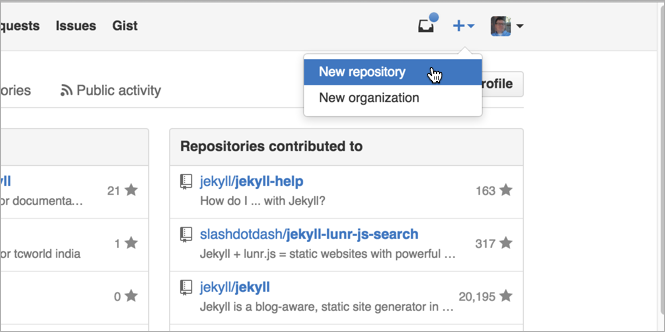
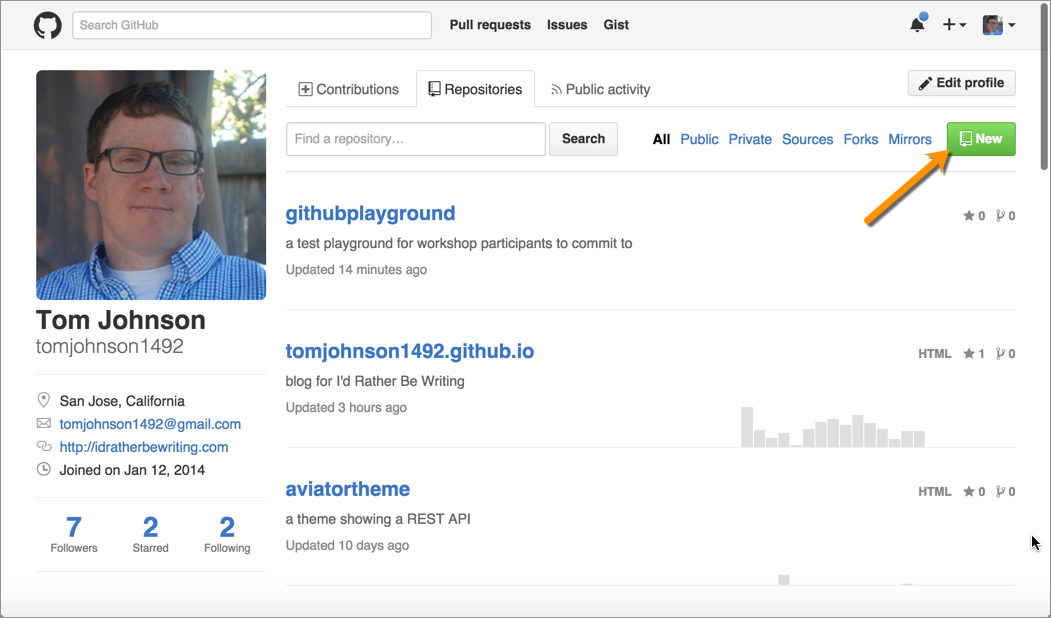
After you're signed in, click the + button in the upper-right corner and select New repository.
Give the repository a name, description, select Public, select to Initialize the repo with a README, and then click Create repository.
Click the Wiki link at the top of the repository.
- Click Create first page.
- Insert your own sample documentation page, preferably using Markdown syntax. Or grab the sample Markdown page of a fake endpoint called surfreport here and insert it into the page.
- Click Save page.
Notice how Github automatically converts the Markdown syntax into HTML with some decent styling.
You could use this Github wiki in an entirely browser-based way for multiple people to collaborate and edit content. However, you can also take all the content offline and edit locally, and then reupload all your edits.
Save the Github repository locally
While viewing your the Github wiki in your browser, look for clone repo link next to the HTTPS button. Copy the link by clicking the Copy to clipboard button.
Cloning the wiki gives you a copy of the content on your local machine. Git is distributed version control software, so everyone has his or her own copy.
More than just copying the files, though, when you clone a repo, you initialize Git in the cloned folder. Git starts tracking your edits to the files, providing version control. You can run "pull" commands to get updates of the online repository pulled down to your local copy. You can also commit your changes and then push your changes back up to the repository if you're entitled as a collaborator for the project.
The "Clone this wiki locally" link allows you to easily insert the URL into a
git clone {url}command in your terminal.{{note}} Note that the wiki is a separate clone URL than the project's repository. Make sure you're viewing your wiki and not your project.{{end}}
In contrast to "Clone this wiki locally," the "Clone in Desktop" option launches the Github Desktop client and allows you to manage the repository and your modified files, commits, pushes, and pull through the Github Desktop client.
If you're a Windows user, open the Git Shell, which should be a shortcut on your Desktop or should be available in your list of programs. (This shell gets installed when you installed Github Desktop.)
- In your terminal, either use the default directory or browse to a directory where you want to download your repository.
Type the following, but replace the git URL with your own git URL that you copied earlier. The command should look like this:
git clone https://github.com/tomjohnson1492/weatherapi.wiki.git{{note}} To paste content into the Git Shell on Windows, right-click and select Paste.{{end}}
Navigate to the directory (either using standard ways of browsing for files on your computer or via the terminal) to see the files you downloaded. If you can view invisible files on your machine, you will also see a git folder.
Set up Git and Github authentication
Set up Git on your computer.
{{tip}}It's easiest to install Git by installing Github Desktop. Installing Github Desktop will include all the Git software as well.{{end}}
If you're installing the Windows version of Github Desktop, after you install Github, you'll get a special Github Shell shortcut that you can use to work on the command line. You should use that special Github Shell rather than the usual command line prompt.
Note that when you use that Github Shell, you can also use more typical Unix commands, such as
pwdfor present working directory instead ofdir(though both commands will work).On a Mac, however, you don't need a special Git Shell. Open the Terminal in the same way — go to Applications > Utilities > Terminal.
You can check to see if you have Git already installed by opening a terminal and typing
git --version.Configure Git with Github authorization. This will allow you to push changes without entering your username and password each time. See the following topics to set this up:
- Set up Git (Note that when you configure your username, use your Github username, which will be something like tomjohnson1492 instead of "Tom Johnson".)
- Generating a new SSH key
- Adding a new SSH key to the ssh-agent
- Adding a new SSH key to your GitHub account
After you make these configurations, close and re-open your terminal.
Make a change locally, commit it, and push the commit to the Github repository
- In a text editor, open the Markdown file you downloaded in the github repository.
- Make a small change and save it.
In your terminal, make sure you're in the directory where you downloaded the github project. To look at the directories under your current path, type
ls. Then usecd {directory name}to drill into the folder, orcd ../to move up a level.Add the file to your staging area:
git add --allGit doesn't track all files in the same folder where the invisible Git folder has been initialized. Git tracks modifications only for the files that have been "added" to Git. By selecting
--all, you're adding all the files in the folder to Git. You could also type a specific file name here instead of--all.{{warning}} Just use Git to track text files. Don't start tracking large binary files, especially audio or video files. Version control systems really can't handle that kind of format well. {{end}}
See the changes set in your staging area:
git statusThe staging area lists all the files that have been added to Git that you have modified in some way.
Commit the changes:
git commit -m "updated some content"When you commit the changes, you're creating a snapshot of the files at a specific point in time for versioning.
The command above is a shortcut for committing and typing a commit message in the same command. It's much easier to commit updates this way.
If you just type
git commit, you'll be prompted with another window to describe the change. On Windows, this new window will be a Notepad window. Describe the change on the top line, and then save and close the Windows file.On a Mac, a new window doesn't open. Instead, the vi editor mode opens up. ("vi" stands for visual, but it's not a very visual editor.) To use this mode, you have to know a few simple Unix commands:
- Arrow keys: You use your arrow keys to move around. You don't use your mouse.
- Insert mode: If you start typing, vi enters the Insert mode.
- Escaping out of Insert Mode: To escape out of Insert mode, press your Escape key.
- Saving: To save your edits, you need to do a "write quit." Press Escape to exit Insert mode. Then Press Ctrl + :. Then type wq for "write quit." If you made changes but don't want to save them, type q! for "quit override."
You can also use other vi commands.
Push the changes to your repository:
git pushNow verify that your changes took effect. Browse to your Github wiki repository and look to see the changes.