Implementing Swagger (OpenAPI specification) with your REST API documentation
I recently gave a presentation that covers the same concepts in this article. See the following:
Introduction
On a recent project, after I created documentation for a new API (Application Programming Interface), the project manager wanted to demo the new functionality to some field engineers.
To prepare for the demo, the project manager summarised, in a PowerPoint presentation, the new endpoints that had been added. The request and responses from each endpoint, along with their parameters, were included as attractively as possible in a number of PowerPoint slides.
During the demo, the project manager talked through each of the slides, explaining the new endpoints, the parameters the users can configure, and the responses from the server. How did the field engineers react to the new demo?
The field engineers wanted to try out the requests and see the responses for themselves. They wanted to “push the buttons," so to speak, and see how the API responded. I'm not sure if they were skeptical of the API's advertised behavior, or if they had questions the slides failed to answer. But they insisted on making actual calls themselves and seeing the responses, despite what the project manager had noted on each slide.
The field engineers' insistence on trying out every endpoint made me rethink my API documentation. All the engineers I've ever known have had similar inclinations to explore and experiment on their own.
I have a mechanical engineering friend who once nearly entirely dismantled his car's engine to change a head gasket: he simply loved to take things apart and put them back together. It's the engineering mind. When you force engineers to passively watch a PowerPoint presentation, they quickly lose interest.
After the meeting, I wanted to make my documentation more interactive, with options for users to try out the calls themselves. I had heard of Swagger (which is now called the OpenAPI specification but still commonly referred to as Swagger). I knew that Swagger was a way to make my API documentation interactive. Looking at the Swagger demo, I knew I had to figure it out.
About Swagger
Swagger is a specification for describing REST APIs. This means Swagger provides a set of objects, with a specific schema about their naming, order, and contents, that you use to describe each part of your API.
You can think of the Swagger specification like DITA but for APIs. With DITA, you have a number of elements that you use to describe your help content (for example, task, step, cmd). The elements have a specific order they have to appear in. The cmd element must appear inside a step, which must appear inside a task, and so on. The elements have to be used correctly according to the XML schema in order to be valid.
Many tools can parse valid DITA XML and transform the content into different outputs. The Swagger specification works similarly, only the specification is entirely different, since you're describing an API instead of a help topic.
The official description of the Swagger specification is available in a Github repository. Some of these elements are path, parameters, responses, and security. Each of these elements is actually an “object” (instead of an XML element) that holds a number of fields and arrays.
In the Swagger specification, your endpoints are paths. If you had an endpoint called “pet", your Swagger specification for this endpoint might look as follows:
paths:
  /pets:
    get:
      description: Returns all pets from the system that the user has access to
      operationId: findPets
      produces:
        - application/json
        - application/xml
        - text/xml
        - text/html
      parameters:
        - name: tags
          in: query
          description: tags to filter by
          required: false
          type: array
          items:
            type: string
          collectionFormat: csv
        - name: limit
          in: query
          description: maximum number of results to return
          required: false
          type: integer
          format: int32
      responses:
        '200':
          description: pet response
          schema:
            type: array
            items:
              $ref: '#/definitions/pet'
This YAML code actually comes from the Swagger Petstore demo.
Here's what these objects mean:
/petsis the endpoint path.getis the HTTP method.parameterslists the parameters for the endpoint.responseslists the response from the request.200is the HTTP status code.$refis actually a reference to another part of your implementation where the response is defined. (Swagger has a lot of$refreferences like this to keep your code clean and to facilitate re-use.)
It can take quite a while to figure out the Swagger specification. Give yourself a couple of weeks and a lot of example specification files to look at, especially in the context of the actual API you're documenting. Remember that the Swagger specification is general enough to describe nearly every REST API, so some parts may be more applicable than others.
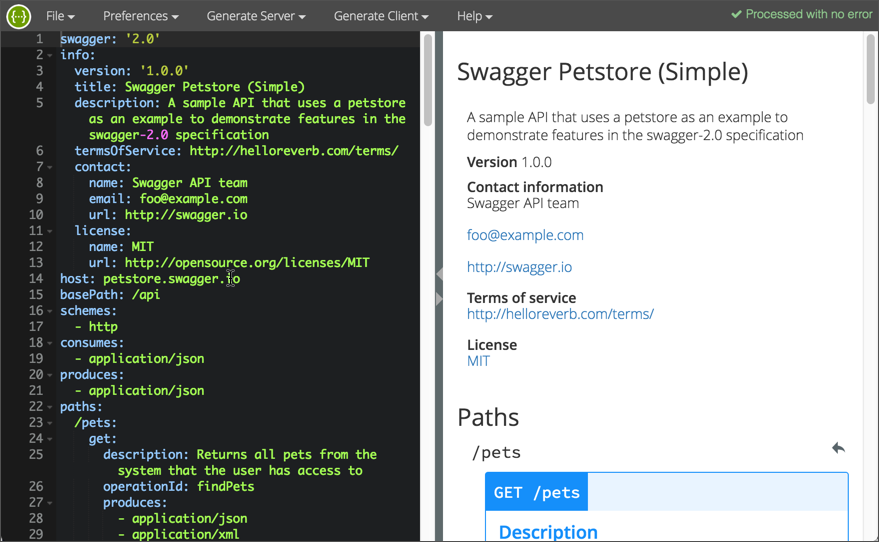
When you're implementing the specification, instead of working in a text editor, you can write your code in the Swagger editor. The Swagger Editor dynamically validates whether the specification file you're creating is valid.

While you're coding in the Swagger Editor, if you make an error, you can quickly fix it before continuing, rather than waiting until a later time to run a build and sort out errors.
For your specification file's format, you have the choice of working in either JSON or YAML. The previous code sample is in YAML. YAML refers to “YAML Ain't Markup Language,” meaning YAML doesn't have any markup tags (<>), as is common with other markup
languages such as XML.
YAML depends on spacing and colons to establish the object syntax. This makes the code more human-readable, but it's also trickier to get the spacing right.
Manual or automated?
So far I've been talking about creating the Swagger specification file as if it's the technical writer's task and requires manual coding in a text editor based on close study of the specification. That's how I approached it, but developers can also automate the specification file through annotations in the programming source code.
Swagger offers a variety of libraries that you can add to your programming code. These libraries will parse through your code's annotations and generate a specification file. Of course, someone has to know exactly what annotations to add and how to add them. Then someone has to write content for each of the annotation's values (describing the endpoint, the parameters, and so on).
Still, many developers get excited about this approach because it offers a way to “automatically” generate documentation from code annotations, which is what developers have been doing for years with other programming languages such as Java (using Javadoc) or C++ (using Doxygen). They usually feel that generating documentation from the code results in less documentation drift.
Although you can generate your specification file from code annotations, not everyone agrees that this is the best approach. In Undisturbed REST: A Guide to Designing the Perfect API, Michael Stowe recommends that teams implement the specification by hand and then treat the specification file as a contract that developers use when doing the actual coding.
In other words, developers consult the specification file to see what the parameter names should be called, what the responses should be, and so on. After this contract has been established, Stowe says you can then put the annotations in your code to auto-generate the specification file.
Too often, development teams quickly jump to coding the API endpoints, parameters, and responses without doing much user testing or research into whether the API aligns with what users want. Since versioning APIs is extremely difficult (you have to support each new version going forward with full backwards compatibility to previous versions), you want to avoid the "fail fast" approach that is so commonly embraced with agile.
From the Swagger specification file, some tools can generate a mock API that you can put before users to have them try out the requests.
The mock API generates a response that looks like it's coming from a real server, but it's really just a pre-defined response in your code and appears to be dynamic to the user.
With my project, our developers weren't that familiar with Swagger, so I simply created the specification file by hand. Additionally, I didn't have free access to the programming source code, and our developers spoke English as a second or third language only. They weren't eager to be in the documentation business.
Parsing the Swagger specification
Once you have a valid Swagger specification file that describes your API, you can then feed this specification to different tools to parse it and generate the interactive documentation similar to the Petstore example I referenced earlier.
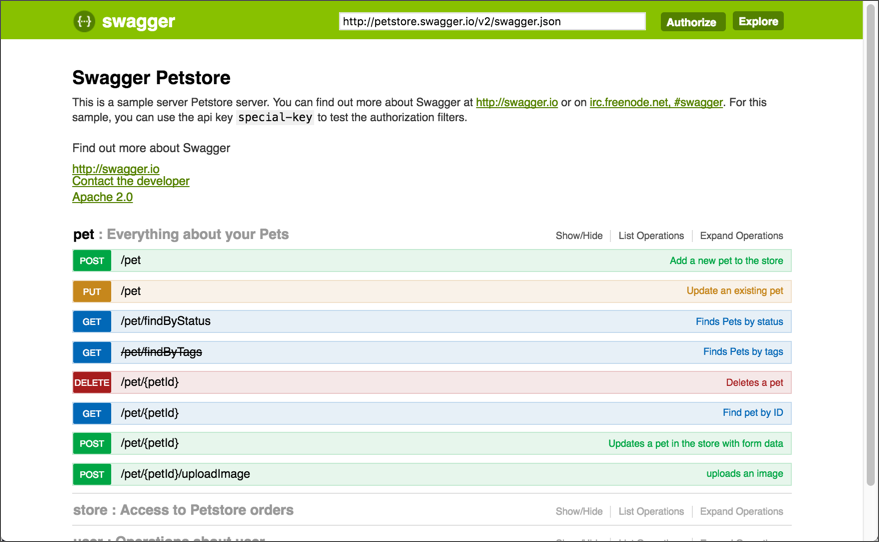
Probably the most common tool used to parse the Swagger specification is Swagger UI. After you download Swagger UI, you basically just open up the index.html file inside the dist folder (which contains the Swagger UI project build) and reference your own Swagger specification file in place of the default one.
The Swagger UI code generates a display that looks like this:

Some designers criticise the Swagger UI's expandable/collapsible output as being dated. I somewhat agree: the collapsed design makes it difficult to scan the information and easily see the details. However, at the same time, developers find the one-page model attractive and like the ability to zoom out or in for details.
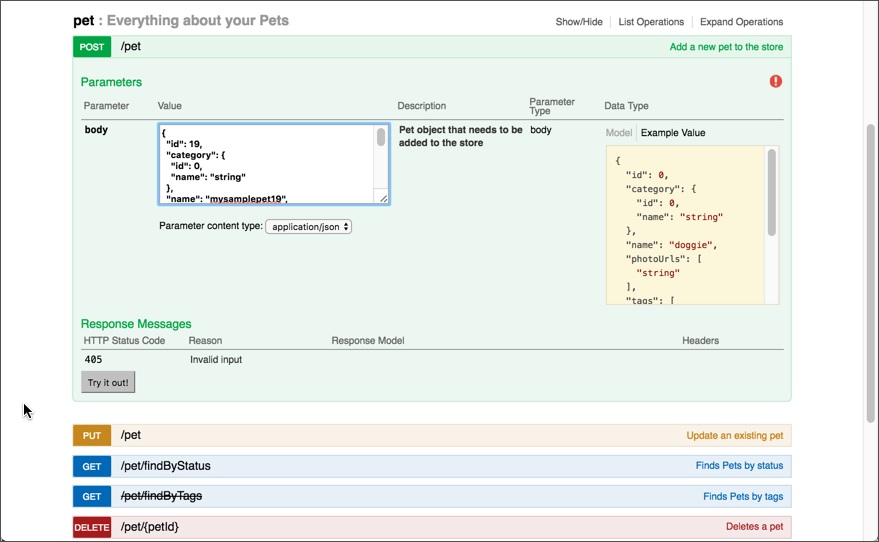
As with most Swagger-based outputs, Swagger UI provides a “Try it out” button. First you populate the endpoint parameters with values. In the following image, users click the Example Value (yellow field) to populate the body parameter with the required JSON. In query parameters, there's a simple form where you enter the values.

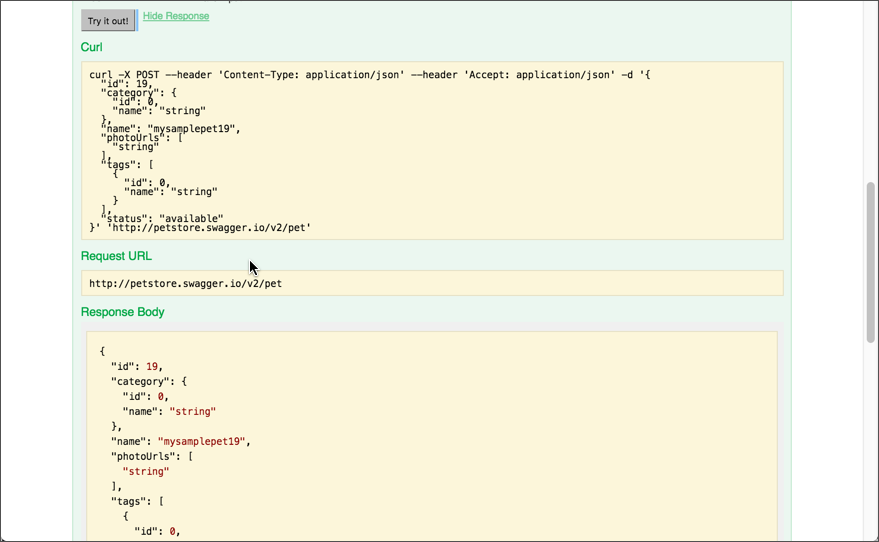
After customizing the parameters, you click Try it out! Swagger UI shows you the cURL format of the request followed by the request URL and response. The response is usually returned in JSON format.

There are other tools besides Swagger UI that can parse your Swagger specification file. Some of these tools include Restlet Studio, Apiary, Apigee, Lucybot, Gelato/Mashape, Readme.io, swagger2postman, swagger-ui responsive theme, Postman Run Buttons and more.
Some web designers have created integrations of Swagger with static site generators such as Jekyll (see Carte). More tools roll out regularly for parsing and displaying content from a Swagger specification file.
In fact, once you have a valid Swagger specification, using a tool called API Transformer, you can even transform it into other API specifications, such as RAML or API Blueprint. In this way you can expand your tool horizons even wider. (RAML and API Blueprint are alternative specifications to Swagger: they're not as popular, but the logic of the specifications is similar.)
Responses to Swagger documentation
With my project, I used the Swagger UI to parse my Swagger specification. I customised Swagger UI's colors a bit, added a logo and a few other features. I spliced in a reference to Bootstrap so that I could have pop-up modals where users could generate their authorisation codes. I even added some collapse and expand features in the description element to provide necessary information to users about a sample project.
Beyond these simple modifications, however, it takes a bit of web developer prowess to significantly alter the Swagger UI display.
When I showed the results to the project managers, they loved it. They quickly embraced the Swagger output in place of the PowerPoint slides and promoted it among the field engineers and users. The vice president of Engineering even decided that Swagger would be the default approach for documenting all APIs.
Overall, delivering the Swagger output was a huge feather in my cap at the company, and it established an immediate credibility of my technical documentation skills, since no one else in the company had a clue about how to deliver the Swagger output.
A slight trough of disillusionment
Despite Swagger's interactive power to appeal to the “let me try” desires of users, I began to realise there were some downsides to Swagger.
Swagger's output is still just a reference document. It provides the basics about each endpoint, including a description, the parameters, a sample request, and a response. It doesn't provide space for a Hello World tutorial, information about how to get API keys, how to configure any API services, information about rate limits, or the thousand other details that go into a user guide.
So, even though you have this cool, interactive tool for users to explore and learn about your API, at the same time you still have to provide a user guide. Similarly, delivering a Javadoc or Doxygen output for a library-based API won't teach users how to actually use your API. You still have to describe scenarios for using a class or method, how to set your code up, what to do with the response, how to troubleshoot problems, and so on. In short, you still have to write actual help guides and tutorials.
With Swagger in the mix, you now have some additional challenges. You have two places where you're describing your endpoints and parameters, and you have to either keep the two in sync, or you have to link between the two.
Peter Gruenbaum, who has published several tutorials on writing API documentation on Udemy, says that automated tools such as Swagger work best when the APIs are simple.
I agree. When you have endpoints that have complex interdependencies and require special setup workflows or other unintuitive treatment, the straightforward nature of Swagger's Try-it-out interface will likely leave users scratching their heads.
For example, if you must first configure an API service before an endpoint returns anything, and then use one endpoint to get a certain object that you pass into the parameters of another endpoint, and so on, the Try it out features in the Swagger UI output won't make a lot of sense to users.
Additionally, some users may not realise that clicking “Try it out!” makes actual calls against their own accounts based on the API keys they're using. Mixing an invitation to use an exploratory sandbox like Swagger with real data can create some headaches later on when users ask how they can remove all of the test data, or why their actual data is now messed up. If your API executes orders for supplies or makes other transactions, it can be even more challenging.
(For these scenarios, I recommend setting up sandbox or test accounts for users.)
Finally, I found that only endpoints with simple request body parameters tend to work in Swagger. Another API I had to document included requests with request body parameters that were hundreds of lines long. With this sort of request body parameter, Swagger UI's display fell hopelessly short of being usable. The team reverted to much more primitive approaches (such as tables and spreadsheets) for listing all of the parameters and their descriptions.
Some consolations
Despite the shortcomings of Swagger, I still highly recommend it for describing your API.
Swagger is quickly becoming a way for more and more tools (from Postman Run buttons to nearly every API platform) to quickly ingest the information about your API and make it discoverable and interactive with robust, instructive tooling. Through your Swagger specification, you can port your API onto many platforms and systems, as well as automatically set up unit testing and prototyping.
Swagger does provide a nice visual shape for an API. You can easily see all the endpoints and their parameters (like a quick-reference guide).
Based on this framework, you can help users grasp the basics of your API.
Additionally, I found that learning the Swagger specification and describing my API helped inform my own API vocabulary. By poring through the specification, I realised that there were four types of parameters: “path” parameters, “header” parameters, “query” parameters, and “request body” parameters. I learned that parameter data types with REST were a “Boolean”, “number”, “integer”, or “string.” I learned that responses provided “objects” containing “strings” or “arrays.”
In short, implementing the specification gave me an education about API terminology, which in turn helped me describe the various components of my API in credible ways.
Swagger may not be the right approach for every API, but if your API has fairly simple parameters, without many interdependencies between endpoints, and if it's practical to explore the API without making the user's data problematic, Swagger can be a powerful complement to your documentation. You can give users the ability to try out requests and responses for themselves.
With this interactive element, your documentation becomes more than just information. Through Swagger, you create a space for users to both read your documentation and experiment with your API at the same time. That combination tends to provide a powerful learning experience for users.
Glossary
API : Application Programming Interface. Enables different systems to interact with each other programmatically. Two types of APIs are web services and library-based APIs.
cURL : A command line utility often used to interact with REST API endpoints. Used in documentation for request code samples.
Endpoint : The end part of the request URL (after the base path). Also sometimes used to refer to the entire API reference topic.
JSON : JavaScript Object Notation. A lightweight syntax containing objects and arrays, usually used (instead of XML) to return information from a REST API.
OpenAPI : The official name for Swagger. Now under the Open API Initiative with the Linux Foundation (instead of SmartBear, the original development group), the OpenAPI specification aims to be vendor neutral.
REST API : Stands for Representational State Transfer. Uses web protocols (HTTP) to make requests and provide responses in a language agnostic way, meaning that users can choose whatever programming language they want to make the calls.
Swagger : An official specification for REST APIs. Provides objects used to describe your endpoints, parameters, responses, and security. Now called OpenAPI specification.
Swagger Editor
: Swagger specification validator. An online editor that dynamically checks whether your Swagger specification file is valid.
Swagger UI : A display framework. The most common way to parse a Swagger specification file and produce the interactive documentation as shown in the Petstore demo.
YAML : Recursive acronym for “YAML Ain't No Markup Language.” A human- readable, space-sensitive syntax used in the Swagger specification file.
Resources and further reading
See the following resources for more information on Swagger:
- API Transformer
- APIMATIC
- Carte
- Swagger editor
- Swagger Hub
- Swagger Petstore demo
- Swagger Tools
- Swagger tutorial (long)
- Swagger tutorial (short)
- Swagger/OpenAPI specification
- Swagger2postman
- Swagger-ui Responsive theme
- Swagger-ui
- Undisturbed REST: A Guide to Designing the Perfect API, by Michael Stowe
(This article was originally published in ISTC Communicator, Autumn 2016.)